
Tutorial: Dialogue Branch Web Service - Exploring the API
- 1. Exploring the API
- 2. Running a basic dialogue
- 2.1. The beginning (/dialogue/start)
- 2.2. Selecting a reply (/dialogue/progress)
- 2.3. Auto-Forward (/dialogue/progress)
- 2.4. Taking a step back (/dialogue/back)
- 2.5. Fast-forward…
- 2.6. Picking up the Conversation (/dialogue/continue)
- 2.7. Where was I? (/dialogue/get-ongoing)
- 2.8. Ending the dialogue (/dialogue/progress)
- 2.9. Cancelling dialogues (/dialogue/cancel)
- 3. What’s next?
| This tutorial was last updated on February 9th, 2024. |
The Dialogue Branch Web Service is a JAVA Spring Boot Application that can be deployed as a web service. It acts as a wrapper around the Dialogue Branch Core Java Library, offering an API that allows you to create client-server dialogue applications.
This tutorial assumes that you’ve successfully installed the Web Service, e.g. by following the Tutorial: Dialogue Branch Web Service - Installation.
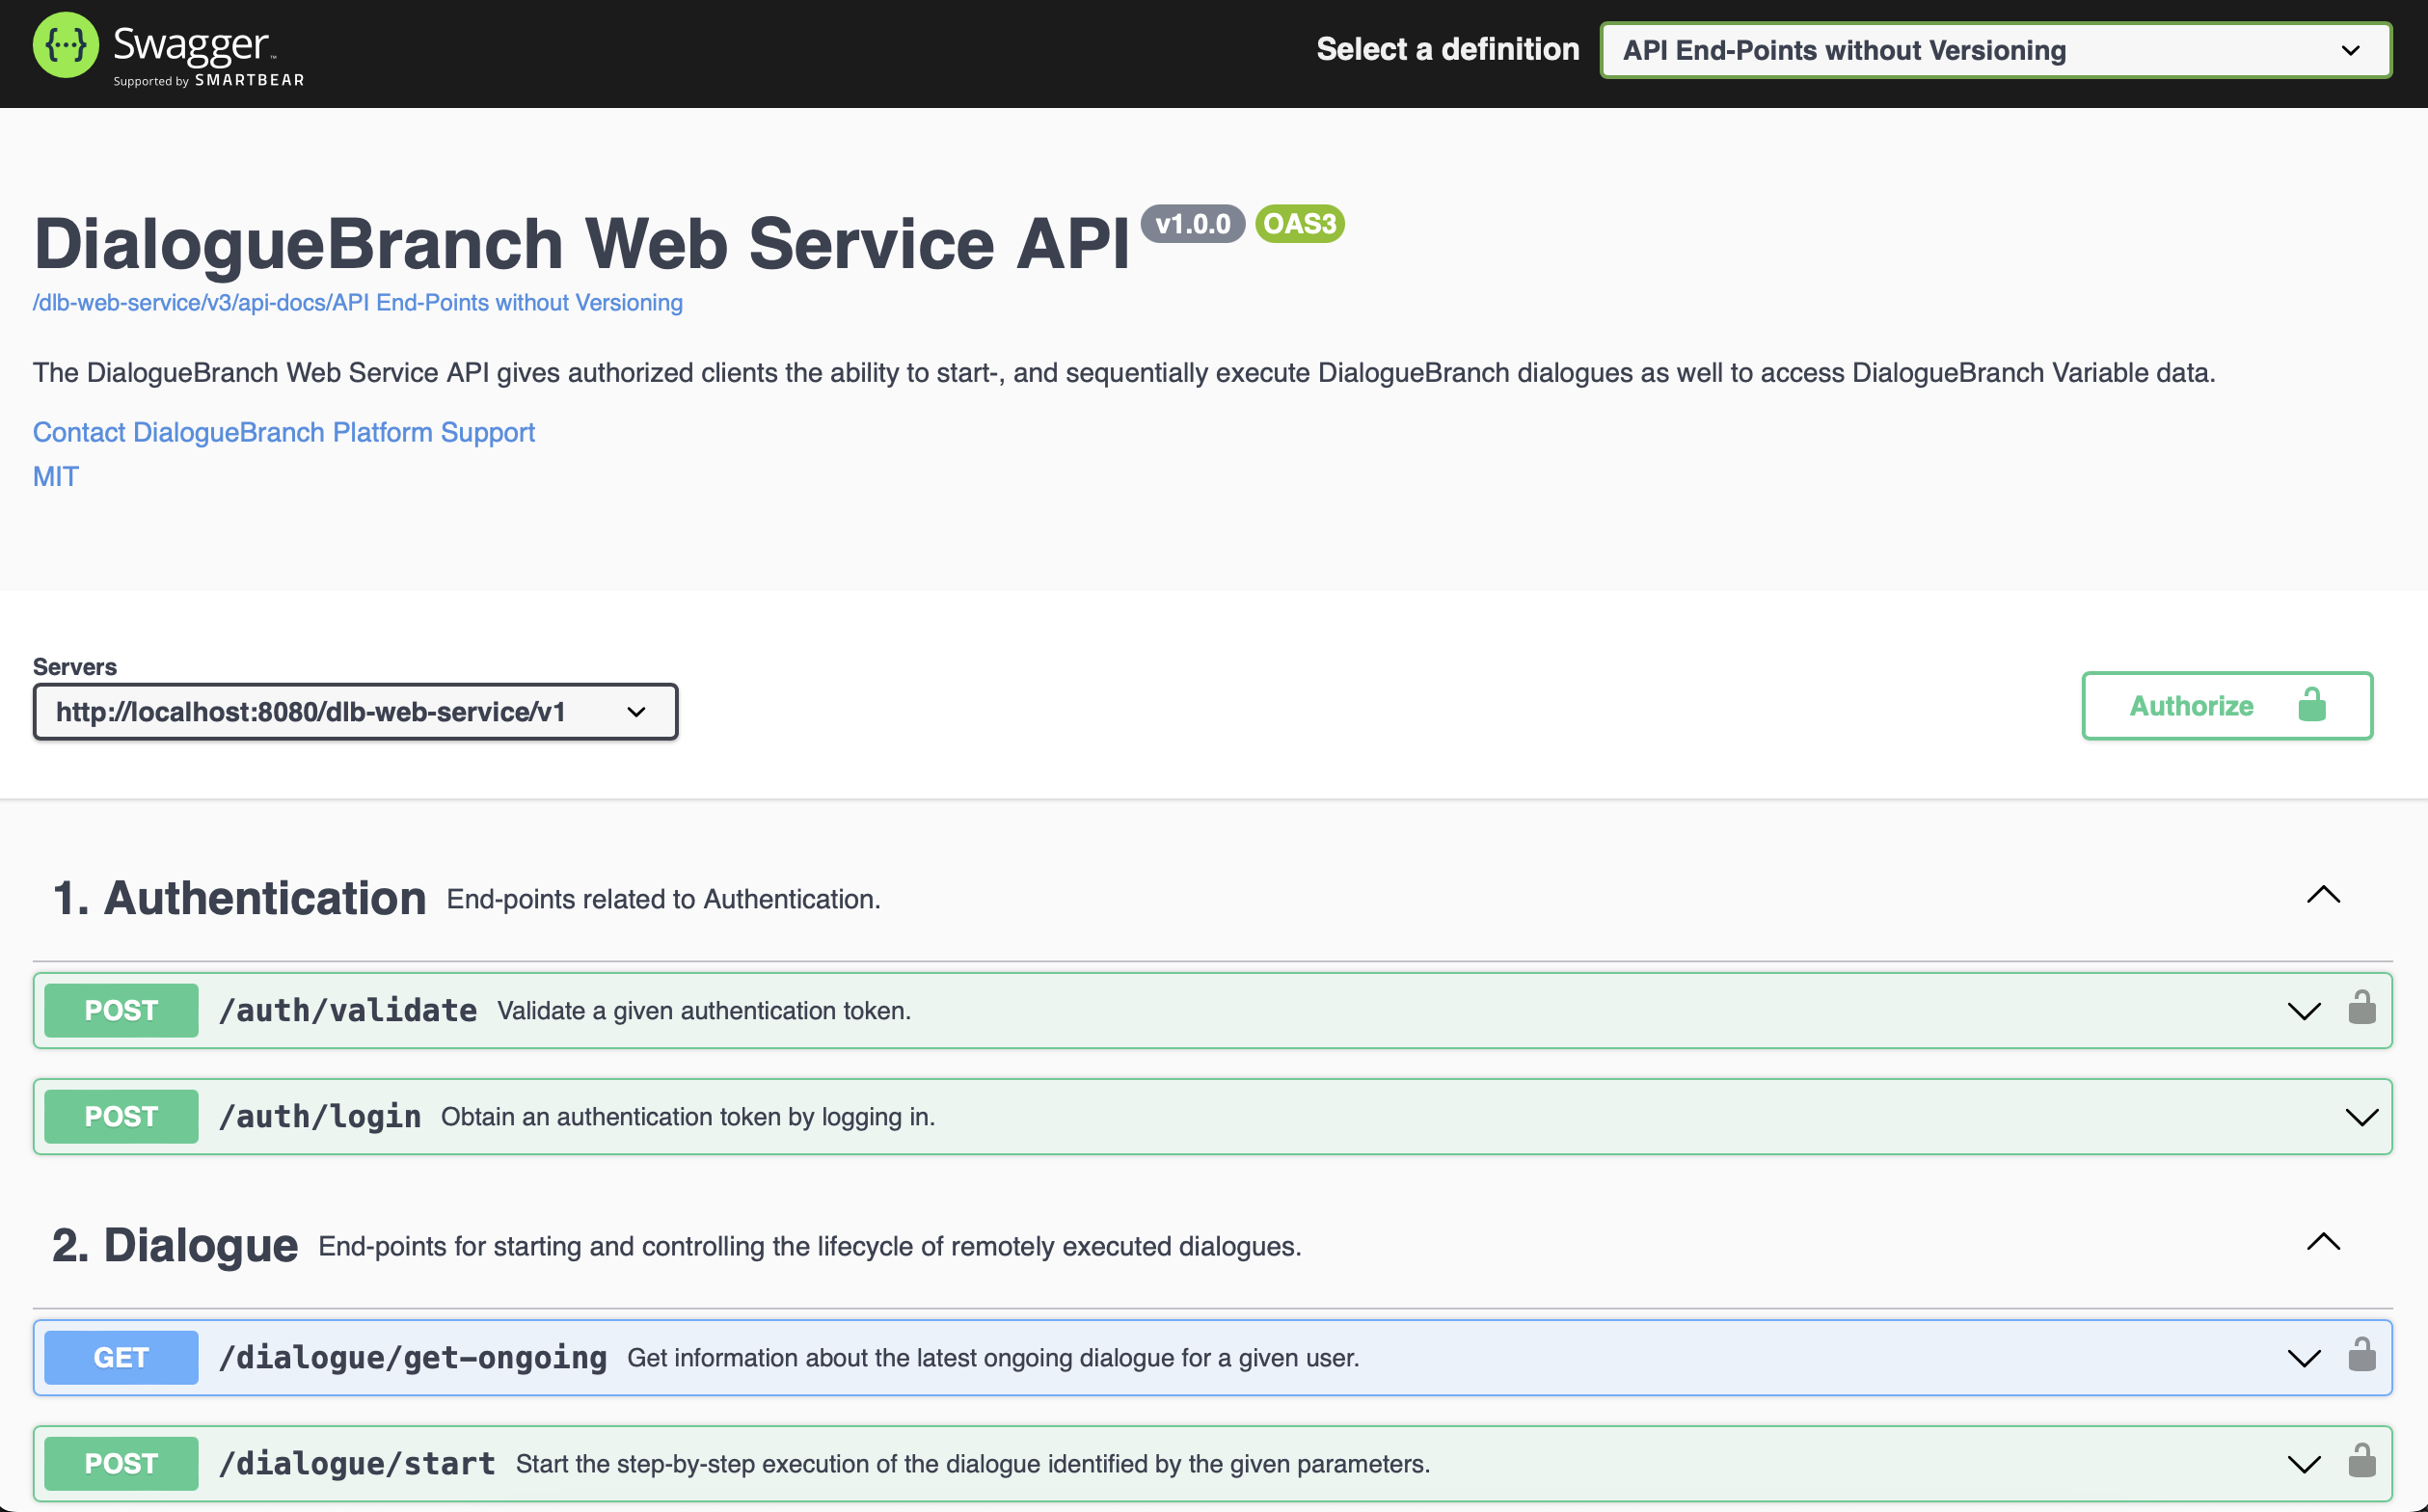
1. Exploring the API
To get started, open a web browser and navigate to your local Web Service deployment (e.g. http://localhost:8080/dlb-web-service). You should see something like the image below:
1.1. Authenticating
All API calls are secured and require a valid X-Auth-Token to be included in the header of each call. In order to obtain such a token, we must first perform a login.
When installing the Web Service you have indicated the dlb-configDataDir, which is where all configuration and log files are stored. In this folder, you will find a file users.xml in which all valid username/password/role combinations are stored. For the purpose of this tutorial, let’s add two test users to this file, like so:
<users>
  <user username="user@example.com" password="p4ssw0rd" role="user" />
  <user username="admin@example.com" password="super-secure-password-123" role="admin" />
</users>
Note that you can edit this users.xml file while the Web Service is running, there is no need to re-launch or re-deploy the service.
Next, open the Swagger page and follow these steps:
-
Click on auth-controller to unfold the set of API end-points related to authentication.
-
Click on the /auth/login end-point to unfold its details.
-
Click on the "Try it out" button in the top right corner of this end-point view.
-
Under
loginParamsfill in the following information:{ "password": "p4ssw0rd", "tokenExpiration": null, "user": "user@example.com" } -
Then, click on Execute in the bottom left of the view.
-
Under "Server response", you should see a Code of 200, and a response body that looks like this:
{ "user": "user@example.com", "token": "eyJhbGciOiJIUzUxMiJ9.eyJzdWIiOiJ0ZXN0IiwiaWF0IjoxNjM3MDY4MDk2fQ.62zcI64ZU12piR-73Sn-chbkjblbn9AqXHIic8UFh1SlSMa7p3Aeha_x51rWMllh6Ch_cYwaiXjv-8enmgX0ag" } -
The token value is our Authentication token that will never expire (because we set
tokenExpirationtonull). Copy this token to some text file for future use. -
Scroll all the way to the top of the page and find in the top right corner the green button "Authorize".
-
Enter the authentication token here and click Authorize (and then Close).
| We are now authenticated as a regular user (instead of an admin user) and can start exploring the rest of the API. If we were to authenticate as a user with the "admin" role, we would be able to specify an additional delegateUser parameter for many of the API end-points that allows us to perform actions on behalf of the delegate user. |
1.2. Summary of API End-Points
Before we can start building our own software client that can communicate with the Web Service, we will explore the functionalities of the API using the Swagger controller.
-
Unfold the
dialogue-controllerto reveal the following end-points:-
/dialogue/get-ongoing - For a given
dialogueName, provides all relevant information on the current state of that ongoing dialogue. -
/dialogue/start - Starts the interaction between user and system for a specific dialogue.
-
/dialogue/progress - Progresses the dialogue a step forward by providing a specific
replyId. -
/dialogue/continue - This will "pick up the conversation" by providing a dialogue name, and resuming any ongoing dialogue where it was left off.
-
/dialogue/cancel - This will cancel an ongoing dialogue, discarding its current state.
-
/dialogue/back - This will cause the dialogue to go one step back.
-
The execution of a Dialogue Branch dialogue between a client and the Web Service is thus a series of API calls, starting with start, followed by a series of progress (and optionally back) calls, that either ends with a call to cancel or by the dialogue naturally ending.
2. Running a basic dialogue
We are going to walk through all the possible steps in a client-server Dialogue Branch application. As an example, we will be using the basic.dlb dialogue which is included in the default set of dialogues available to the Web Service. If you haven’t configured the Web Service to serve a different set of dialogues, this should be available. The basic.dlb dialogue is a very simple dialogue with 9 nodes that demonstrates how dialogues start, progress and end. This dialogue script is also available in the dlb-examples repository on GitHub.
In the steps below, we’re going to show the series of API calls a client might take to execute this dialogue step-by-step:
2.1. The beginning (/dialogue/start)
-
Unfold the /dialogue/start endpoint and click on "Try it out". There are five parameters that can be entered at this point:
-
dialogueName- The name of the dialogue that we want to start, this should be "basic", since we want to start the dialogue inbasic.dlb(and the extension is not part of the dialogue name). -
language- For now we choose "en", and we deal with translations later. -
timezone- The current timezone as a location-based identifier from the tz database. For example Europe/Lisbon. -
(optional)
delegateUser- If authenticated as an "admin" user, use this to specify the "real" end-user for which to start the dialogue. Leave empty for now. -
(optional)
sessionId- An optional identifier that is attached to the dialogue logs, allowing this dialogue session to be cross-referenced with external logs. Leave empty for now.
-
-
When you’ve filled in "basic" as
dialogueName, "en" aslanguageand any validtimeZone, you can click "Execute", resulting in the following JSON Response:
{
  "dialogue": "basic",
  "node": "Start",
  "loggedDialogueId": "bf758d37cef84ff3a5ef818abce2f6c0",
  "loggedInteractionIndex": 0,
  "speaker": "Martin McOwl",
  "statement": {
    "segments": [
      {
        "segmentType": "TEXT",
        "text": "Hi, my name is Martin McOwl, and this is the Default Dialogue Branch Test dialogue."
      }
    ]
  },
  "replies": [
    {
      "replyId": 1,
      "statement": {
        "segments": [
          {
            "segmentType": "TEXT",
            "text": "Nice to meet you Martin McOwl."
          }
        ]
      },
      "actions": [],
      "endsDialogue": false
    },
    {
      "replyId": 2,
      "statement": {
        "segments": [
          {
            "segmentType": "TEXT",
            "text": "Goodbye."
          }
        ]
      },
      "actions": [],
      "endsDialogue": true
    }
  ]
}
When you are building a Client application, you need to extract this JSON response and construct your user interface around it. For now, it suffices to understand that this JSON response contains the speaker ("Martin McOwl"), the statement ("Hi, my name is Martin McOwl, and this is the default Dialogue Branch Test dialogue.") and two reply options: (1) "Nice to meet you Martin McOwl.", or (2) "Goodbye.". Furthermore, the JSON response contains some meta information that we will need to progress the dialogue: the loggedDialogueId (e.g. bf758d37cef84ff3a5ef818abce2f6c0) and the loggedInteractionIndex (0).
2.2. Selecting a reply (/dialogue/progress)
-
Next, we want to advance the dialogue by sending the reply "Nice to meet you Martin McOwl.". For this we will unfold the /dialogue/progress end-point, and click on "Try it out". Besides the optional
delegateUservariable explained earlier, there are three parameters for this call:-
loggedDialogueId- This is the identifier of the current dialogue instance that you’ve obtained from the previous call to start-dialogue progress-dialogue or back-dialogue. We fill in the value obtained earlier:bf758d37cef84ff3a5ef818abce2f6c0. -
loggedInteractionIndex- This is the index of the current interaction in the dialogue, as obtained in the previous call. We fill in:0. -
replyId- The ID of the selected reply. Since we want to say "Nice to meet you Martin McOwl.", we fill in1(note that the firstreplyIdis "1" and not "0" as is common in listings).
-
-
When you’ve filled in everything you can click "Execute", resulting in the following JSON Response:
{
  "value": {
    "dialogue": "basic",
    "node": "Continue",
    "loggedDialogueId": "bf758d37cef84ff3a5ef818abce2f6c0",
    "loggedInteractionIndex": 2,
    "speaker": "Martin McOwl",
    "statement": {
      "segments": [
        {
          "segmentType": "TEXT",
          "text": "This dialogue is very basic, and shows only dialogue flow and ending."
        }
      ]
    },
    "replies": [
      {
        "replyId": 1,
        "statement": null,
        "actions": [],
        "endsDialogue": false
      }
    ]
  }
}
This response is very similar to the previous one (JSON Response #1). The notable difference is that there is only 1 reply option, and its statement field is empty (null). This is what is called an "Auto-forward Reply" (see the Dialogue Branch Language doc page), and the idea is that the dialogue can "automatically move forward" after some time, or after the user pressed a button (e.g. "Continue").
2.3. Auto-Forward (/dialogue/progress)
-
Make an additional call to the /dialogue/progress-dialogue end-point with
loggedDialogueId: bf758d37cef84ff3a5ef818abce2f6c0,loggedInteractionIndex: 2, andreplyId: 1. We will get the following response:
{
  "value": {
    "dialogue": "basic",
    "node": "DialogueMenu",
    "loggedDialogueId": "bf758d37cef84ff3a5ef818abce2f6c0",
    "loggedInteractionIndex": 4,
    "speaker": "Martin McOwl",
    "statement": {
      "segments": [
        {
          "segmentType": "TEXT",
          "text": "We deal with statements, reply options, and ending dialogues."
        }
      ]
    },
    "replies": [
      {
        "replyId": 1,
        "statement": {
          "segments": [
            {
              "segmentType": "TEXT",
              "text": "Tell me about statements."
            }
          ]
        },
        "actions": [],
        "endsDialogue": false
      },
      {
        "replyId": 2,
        "statement": {
          "segments": [
            {
              "segmentType": "TEXT",
              "text": "Reply Options?"
            }
          ]
        },
        "actions": [],
        "endsDialogue": false
      },
      {
        "replyId": 3,
        "statement": {
          "segments": [
            {
              "segmentType": "TEXT",
              "text": "How do you end a dialogue?"
            }
          ]
        },
        "actions": [],
        "endsDialogue": false
      }
    ]
  }
}
2.4. Taking a step back (/dialogue/back)
The structure of this response doesn’t contain anything we haven’t seen before. So, we take the opportunity to look at the /dialogue/back end-point. Let’s assume our previous "Auto-forward Reply" automatically advanced the dialogue, but it went a bit too quick for the liking of our end-user. In that case, a UI designer could offer a "Back" button, that, when pressed calls the /dialogue/back end-point.
-
Unfold the /dialogue/back end-point and click on "Try it out".
-
Fill in the
loggedDialogueIdasbf758d37cef84ff3a5ef818abce2f6c0andloggedInteractionIndexas4and press "Execute".
The response that you will get, will be exactly the same as in the previous step (JSON Response #2). Essentially, the Web Service looks up the previously returned result and will return it again. If there is no previous step, it would just return the current step.
2.5. Fast-forward…
From here, we will fast forward to a point in the conversation dealing with ending dialogues.
-
Make a call to the /dialogue/progress end-point with
loggedDialogueId: bf758d37cef84ff3a5ef818abce2f6c0,loggedInteractionIndex: 2, andreplyId: 1. -
Make another call to the /dialogue/progress end-point with
loggedDialogueId: bf758d37cef84ff3a5ef818abce2f6c0,loggedInteractionIndex: 6, andreplyId: 3. -
Make another call to the /dialogue/progress end-point with
loggedDialogueId: bf758d37cef84ff3a5ef818abce2f6c0,loggedInteractionIndex: 8, andreplyId: 1.
You will get the following JSON Response:
{
  "value": {
    "dialogue": "basic",
    "node": "DialogueEnding2",
    "loggedDialogueId": "bf758d37cef84ff3a5ef818abce2f6c0",
    "loggedInteractionIndex": 10,
    "speaker": "Martin McOwl",
    "statement": {
      "segments": [
        {
          "segmentType": "TEXT",
          "text": "Alternatively, a reply option can point to the reserved node name \"End\". When the dialogue reaches this node, the dialogue is also over."
        }
      ]
    },
    "replies": [
      {
        "replyId": 1,
        "statement": {
          "segments": [
            {
              "segmentType": "TEXT",
              "text": "This reply option points to the \"End\" node."
            }
          ]
        },
        "actions": [],
        "endsDialogue": true
      },
      {
        "replyId": 2,
        "statement": {
          "segments": [
            {
              "segmentType": "TEXT",
              "text": "This one points to a node without replies."
            }
          ]
        },
        "actions": [],
        "endsDialogue": false
      }
    ]
  }
}
Note that from the 2 reply options, the first one ("This reply option points to the \"End\" node.") has the additional parameter endsDialogue set to true. When building a User Interface, you use this information in two ways. First, when the user selects this option, you don’t have to wait for a response from the server (as we will see soon). Second, you might wish to indicate to the user that selecting this reply option will end the conversation, for example by adding an "Exit Icon" to the reply button.
2.6. Picking up the Conversation (/dialogue/continue)
But before we continue the conversation, we take a look at the /dialogue/continue end-point. If for whatever reason, you have lost the current "state" of your user interface (e.g. the user logged out, the browser was closed, or your application has crashed - it happens!), you can use this end-point to retrieve the latest state of a given dialogue. So, if you know that your user was interacting with the basic.dlb dialogue, but you’ve lost track of where you were, you can call the following:
-
/dialogue/continue with
dialogueNameasbasicandtimeZoneas any valid input.
This call will return exactly the current state of the conversation, which is the same output as JSON Response #4 above.
2.7. Where was I? (/dialogue/get-ongoing)
In the unfortunate event that you (or your client) has forgotten whether or not there was an ongoing conversation, there is another method to recover: the /dialogue/get-ongoing end-point. This end-point can be called without any parameters (besides the optional delegateUser if you are acting on behalf of another user) and will provide information on the question "What was the latest ongoing dialogue?". An "ongoing" dialogue is any dialogue that has not been specifically cancelled (by a call to /dialogue/cancel) and hasn’t ended naturally. Making this call through Swagger now will return something like this:
{
  "value": {
    "dialogueName": "basic",
    "secondsSinceLastEngagement": 11
  }
}
Based on the value of secondsSinceLastEngagement you may decide to continue this conversation through the /dialogue/continue end-point.
2.8. Ending the dialogue (/dialogue/progress)
Now it’s time for our final move; we want to end our dialogue by selecting the Reply "This reply option points to the End node.". To do this, we make the following call:
-
/dialogue/progress with
loggedDialogueId: bf758d37cef84ff3a5ef818abce2f6c0,loggedInteractionIndex: 10, andreplyId: 1.
As this is the end of the dialogue, the response will not contain anything useful. To be exact, this is what you can expect the Dialogue Branch Web Service to return:
{
  "value": null
}
2.9. Cancelling dialogues (/dialogue/cancel)
Finally, if you (or your client app) wants to stop engaging in a certain dialogue (and not being able to pick it up later), you can choose to use the /dialogue/cancel end-point. This end-point simply requires the loggedDialogueId (e.g. bf758d37cef84ff3a5ef818abce2f6c0) and will set that dialogue’s state to cancelled.
3. What’s next?
So now you have a running Dialogue Branch Web Service, and you understand how you can use its API to start, progress, continue and end dialogues. The next step is to move away from Swagger, and start with a proper client application.
The next tutorial in this series is currently being written…
| If you found errors or have questions about this tutorial, please let us know by sending an email to info@dialoguebranch.com. |